
Printer Profiles – A Deep Dive
February 3, 2022 by Marco Roos

Printer profiles are a seemingly daunting and complex topic - they have been discussed and dissected millions of times, and yet, what they are what they do still confuses people across our industry. The reality is that printer profiles are a lot less mysterious than most people think, and every print shop in the world is using them whether or not they are aware of it. This article provides a bird’s eye view of the profile creation process, and from it you will gain an understanding of why you should invest some time and perhaps money into developing your profiling skills.
What is a printer profile?
A printer profile is a collection of settings that determine how and what our printer prints. It is used by a driver or a piece of software called a RIP and is often provided by the manufacturer of the material or the reseller who supplied the material. Materials do have different physical properties and a printer will have to adjust its settings in order to achieve the desired results.
It’s important to note that printers can start printing differently over time. When this happens, it is the printer itself that starts to drift and not the profile. Printer profiles are static, which means that they don’t change. It’s like taking a snapshot for a new passport photo - it makes sense to renew it every 10 years or so, not because the pic got too old, but because faces change. The same occurs with printers, materials, and ambient influences that might alter the printing results.
What do we need to create our own printer profiles?
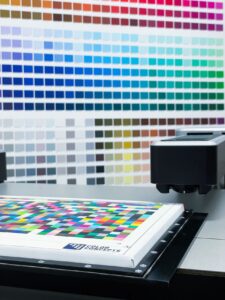
Color patches are being measured by a color measurement device
Firstly, profiling requires a color measurement device, preferably a spectrophotometer. Spectrophotometers are devices that contain a calibrated light source and a sensor that captures the reflected light from the material. This sensor converts the reflected light into a digital waveform, known as “spectral data”. Depending on the type of material you are measuring, you might need specific tools for the measurement device. Think of fabrics, which might warp or have an uneven surface that scatters the light. We will cover the different measurement devices on the market today in more detail in another blog post, but for now, suffice to say that measurement devices come in all shapes and sizes. They range in price from $1,000 to $15,000 and are configurable with many options. Contact us if you want to know more about what is available or which ones we use in our labs.
Besides a measurement device, we will also need software to analyze the measurements and calculate the adjustments needed to get the desired output. All RIP software do have the capability to perform at least 4 of the 5 steps listed below. The 5th step requires the software to have the ability to create the so-called ICC profiles, but more about that later. Some RIP softwares do have their own ICC creator, others require you to have a 3rd party software solution. The most famous 3rd party ICC creator is the i1 Profiler, which is made by X-Rite.
Profiling, Step-by-Step
The creation of a printer profile consists of 5 individual steps, some of which can be skipped with certain printer models (we will discuss this later).
Step 1: Preparation
The first step is probably the most obvious one: make sure the printer is working properly and handles the material such that it performs optimally. Every printer has manual or automated processes to ensure all its print heads are firing, and to compensate the material feed for the material thickness. Make sure to check (and double-check!) these settings, since there is no profile or software magic that will be able to fix misfiring, clogged, or misaligned print heads.
Once everything is set up correctly, it is time to start thinking about what we are trying to achieve. High quality, high print speed, or a mix of both? High quality often means a lower speed, and vice versa a higher speed will cost quality. As a note, most profiles that can be downloaded from the ColorBase Profile Search tool are a mix of speed and quality - the sweet spot for most printing companies.
Step 2: Ink Restrictions
Once we have determined our print priorities, and ensured our printer is running smoothly, we have to verify that the printer is laying down correctly calibrated ink amounts. The first step of this process is to make sure that all ink channels are restricted to meet the desired target. Most RIP software will set the target at the point where the dark colors (cyan, magenta, yellow and black) reach the ‘tipping point’. This tipping point occurs when adding more ink starts to cause image quality issues, or no longer adds any additional color and only makes the print darker. Most RIP softwares also use the measurements taken during this step to set the light ink amounts and light ink mixing levels. It’s important to remember that 100% light ink is as much liquid as 100% dark ink and since we are fighting ink amounts here, it is critically important for the light inks to be set correctly.
As you are probably beginning to see, ink restrictions are a giant topic all on their own. Most RIP software will set them automatically with good results, but there are a lot of great tricks you can play once you have an advanced understanding of the mathematics behind them. Let us know through the poll below if you want to know more about them.
Step 3: Linearization
After the ink restrictions have been set, and we have found a new 100% for each color channel, and the dark and light inks are mixed, we are ready for the next part of the process: making sure that each step in between the material color (0% ink) and the maximum ink amount (our new 100%) prints correctly. This is fairly simple: the RIP software generates a chart with multiple steps for each ink color channel. Note that this chart looks almost the same as the one we measured in step 2, but this time the ink channels are clipped to the new 100% values we found and the light inks are mixed into the dark inks. Most RIP software produces a chart that contains 20 or 33 steps per color channel. By measuring each step and comparing the values to the target, the software calculates the correction it needs to make in order to reach the desired target. Imagine that our target is to get a linear result, this means that when we ask the printer to print 50% of a certain color, it will print enough ink to produce 50% on the material. This sounds easy, but keep in mind that materials absorb ink (and some more than the others). Also aging of printheads and changes in environment will have an impact on how inks dry up. For that reason, it is recommended to linearize the printer regularly.
Some printers do have built-in measurement devices that are capable of performing this calibration all by themselves. There is no guarantee that this will work as well as an external measurement device, especially when calibrating materials with uneven surfaces, such as textiles, mesh banners, or anything transparent or reflective. We are planning another Deep Dive article about the profiling of transparent and backlit material. Keep an eye on this blog!

Step 4: Ink limits
This step sounds simple, but can be very complicated. The simple version is that you print a specifically designed chart from the RIP software, and pick the last value in the row that does not show issues. The complicated version is that it is never that easy and that this is the only step of the profiling process you have to decide all by yourself, without the help of measurement devices.
We have focussed on individual ink channels so far, but now it is time to look at what happens when we start mixing inks. Creating red, green, or blue, requires us to mix 100% cyan, 100% magenta, and 100% yellow, resulting in a 200% ink load. If we then want to make dark red, dark blue, or dark yellow, we will have to mix in one of the other colors (magenta or cyan), until the combination turns so dark that we start calling it black. This results in a 300% ink load. The problem with most inkjet inks is that the combination of cyan, magenta, and yellow will not create a deep dark black, and for that reason, we will start adding black inks until we reach the point where the ink amount becomes so high that we will start seeing issues, or where inks no longer dry in time.
Our goal is to define ink limits as high as possible - yes, higher is better! It is a myth that lowering the ink limit will save tons of ink. There are better and more efficient ways to achieve ink efficiency, without compromising the quality of the profile.
Step 5: ICC Profiles
We are almost done, and in some ways we already are! We created a setup that prints with the speed we desire, the amounts we need, and the result looks great already! There is one problem: up until now we have adjusted amounts of inks, but we haven’t looked at the colors yet. The most common method is to create an ICC profile, a standardized file format and method of creating a digital color snapshot of a device that creates or registers color. Printers are obvious, but also displays, projectors, cameras and scanners can be profiled with ICC profiles.
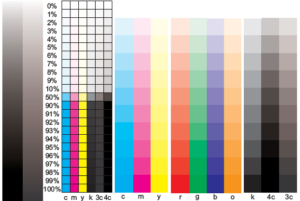
This is a visual analysis of colors and transitions
This step also requires a measurement device and software that allows you to create ICC profiles. Most modern versions of RIP software do have this capability built in. The first step is to print the so-called “ICC target”, a file that contains between 1,000 and 2,000 colored patches. The number of patches depends on the type of printer you have. If your printer has additional colors, besides the CMYK colors, such as orange or green, the number of patches could increase to more than 3,000. Make sure all the patches are smooth, clean, and dry before measuring. Some inks will have drastic color changes while drying, and measuring too early will result in a snapshot of your printer which is inaccurate.
Let it dry, measure the patches, and move on the next step: setting the ICC parameters. Now this is where things become more complex. All the various RIP software and profiling solutions offer a wide range of settings and tools to optimize the results, but we will cover the detailed ins and outs of ICC settings in a separate blog post in the future.
What’s next?
Practice, practice, practice. Printer profiling is a hands-on process and it requires practice. Reading this blog will most likely not make you a profiling professional, but it gives you the theoretical background you need to understand what you are doing. Contact us if you are interested in onsite training or a classroom training in one of our profiling labs. And even if you are a professional with tons of experience: there is always something new to learn - RIP software and printers keep evolving!

Poll: What topic would you like us to 'deep dive' into next?

Marco is the founder of Color Concepts which started as a services business in the digital printing industry. Marco was active as a trainer and consultant in color management in more than 87 countries, but he soon realized that the future is in data and connected ecosystems and started the development of ColorBase. Today Marco’s role is that of a visionary leader and strategist.
Read more articles
Announcing the Fujifilm Acuity Prime Hybrid Launching Materials Program – ColorBase is proud to play a part!
The Launching Materials Program – What Is It? Fujifilm and ColorBase are collaborating on the Fujifilm Acuity Prime Hybrid…
Dissecting Delta E and the Mathematical Difference Between Colors
When discussing colors, we often don’t need to see two hues or color family types next to each other…
ColorBase Announces Participation in Color Quality Conference ’24
Capelle aan den IJssel, The Netherlands – 22 January, 2024 ColorBase is thrilled to announce its participation in the…